Creating a custom self-serve ad booking system to sell ads in a newsletter
I went out to find a simple ad management tool that would allow me to sell flat-fee ad blocks without the complicated, privacy-hungry setup of larger ad platforms. But no luck. So I rigged up my own self-serve tool by connecting a couple of spreadsheets with a form builder via Zapier.
Overview
Each issue of Dense Discovery includes two different ad types: one sponsor slot and four text-based classified ads. To sell those, I wanted a simple system that...
- allows customers to purchase ad slots
- collects the required customer data and ad assets
- sends a confirmation and tax receipt via email
- stores the data somewhere I can easily access/edit it, and
- automatically marks sold ad slots as unavailable.
What I like about the setup I came up with is that it’s very flexible and completely customised to suit the needs of DD’s ad formats. It does have a couple of shortcomings, though:
- Some of the main parameters of a booking such as the date and the price can be easily changed during the booking process by altering the URL. I don’t consider this a major issue, though, since the volume of bookings is relatively small and I can easily detect (cancel & refund) bookings that have manipulated this info. This hasn’t occurred so far, and I’m hoping my sharing of the inner workings of the system here won’t change that.
- Since there is no session that ‘reserves’ ad slots temporarily during checkout, double-bookings can and do occur. This happens relatively frequently in my case, because I open up ad slots in batches and then several customers on my waitlist rush to book an ad as quickly as possible. I haven’t figured out a bullet-proof way around this, but it’s only an issue if you expect a surge of visitors trying to book the same ad simultaneously.
Here’s what you will need to recreate my setup:
- A paid Formsite account on a tier that allows you to accept payments (from ~$33/month)
- A paid Zapier account (from ~$20/month)
- A Google Drive account to create a couple of spreadsheets
- A Stripe account
Here is a short overview of how these apps work together to facilitate ad bookings:
- On a publicly accessible Google Sheet I list all available ad slots.
- A customer clicks on one of the available ad slots and is taken to a form hosted by Formsite.
- The form collects the customer’s details and payment.
- (Only) if the payment is successful, Formsite sends a confirmation email/tax receipt to the customer and to myself, and a simplified version of that email to Zapier.
- A Zap pushes the data to a different Google Sheet that allows me to manage all the upcoming bookings in one place.
- And another Zap is triggered that marks the booking in the earlier spreadsheet as ‘unavailable’.
Okay, let’s get started!
1 – Creating the booking form
First, we create the forms on Formsite that collect all the necessary information from our customers. Before diving into the form builder, don’t forget to connect the form to your Stripe account (first with test API keys, later with the live ones).
The two different ad formats in DD – sponsor slots and classified ad slots – require a slightly different setups:
For my sponsor slots, the booking form only consists of text fields for name, email address and billing information. I don’t actually collect the content of the ad itself (text and image). Most sponsors need time to consider how they want to promote their product/service, so I just remind them in the email confirmation they receive after the booking that the ad assets are due at least two weeks before their ad runs and they then send them to me via email.
For my classified ads I do collect the content of the actual ad, but to speed things up, I split the process into two forms: first I ask for their name, email address and billing info, then collect payment and only after a successful payment, they are forwarded to a second form to collect the ad copy. More on this slightly different setup later.
For simplicity’s sake, I’m going to focus on the setup for my sponsor bookings first.
One advantage of Formsite is that I can pass values to a form using URL parameters. My customers will be coming from a spreadsheet where they clicked on a link to reach the form. As I will discuss further below, this link will include three pieces of information:
- The date of the ad
- The price of the ad
- The row number (which is a unique identifier for each ad slot)
We can pass this info to the form by including those three parameters in the URL, like so:
myform.com?date=11-02-2022&price=100&row=123
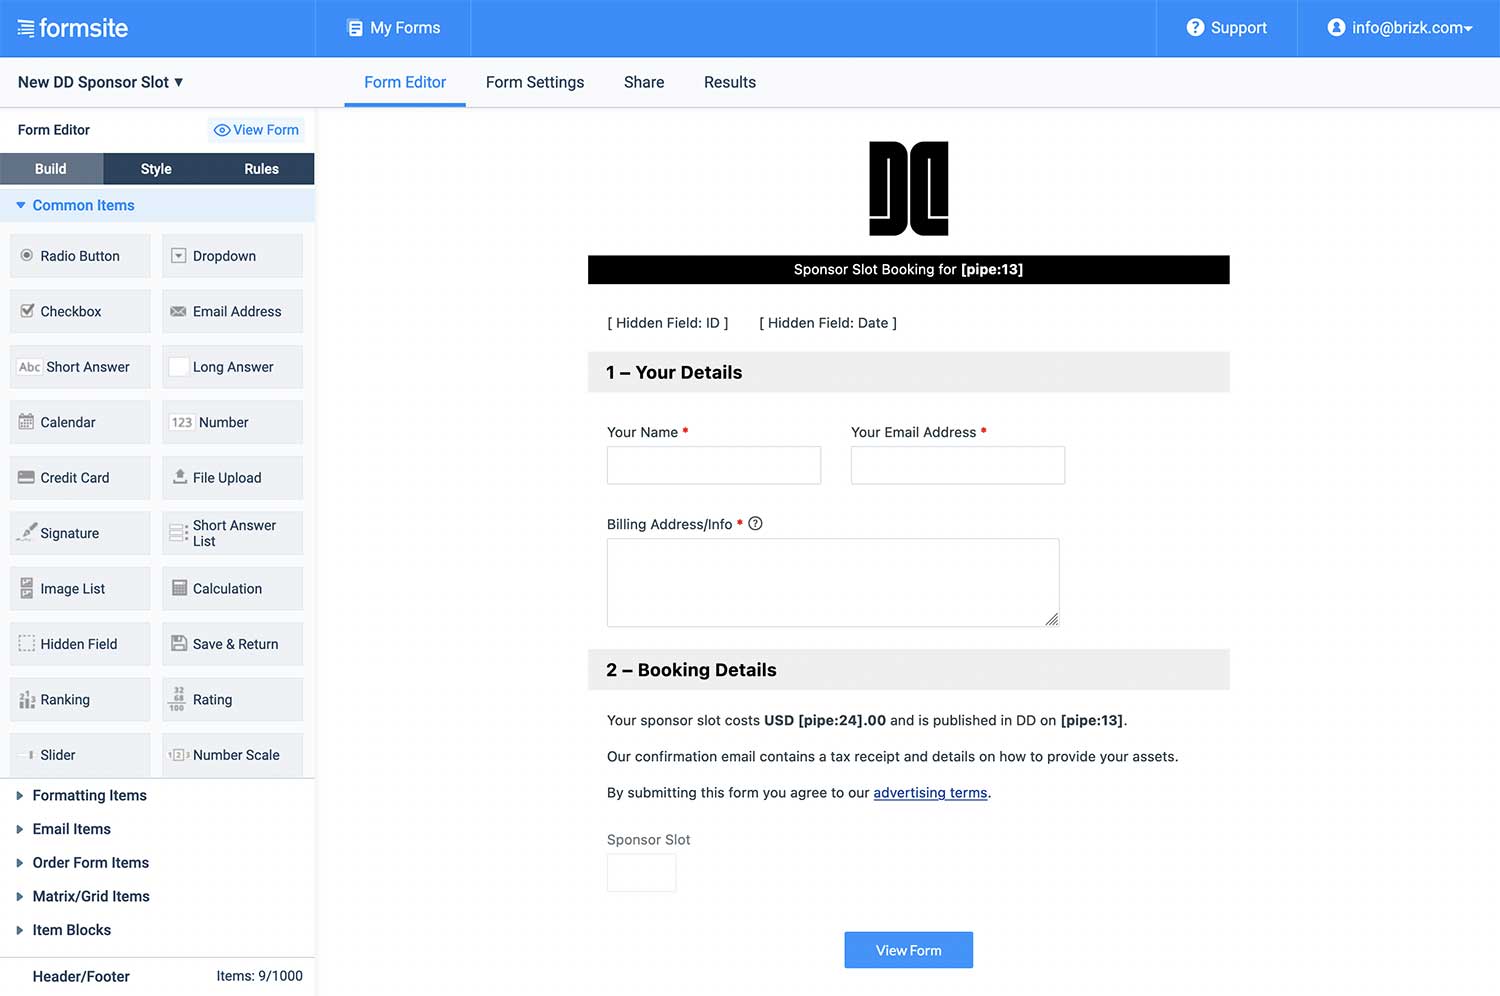
For the form to be able to ‘receive’ this info, we first need to add the required fields as ’hidden fields’. As per the screenshot above, I added a hidden field for ‘date’ and one for ‘row’ (I call this field ID). In Formsite, prices use a special field called ‘Text Field Pricing’ so that it can do calculations with it if necessary. Once added, you can either leave it visible or hide it with a simple display: none as a custom CSS entry, which is what I did.
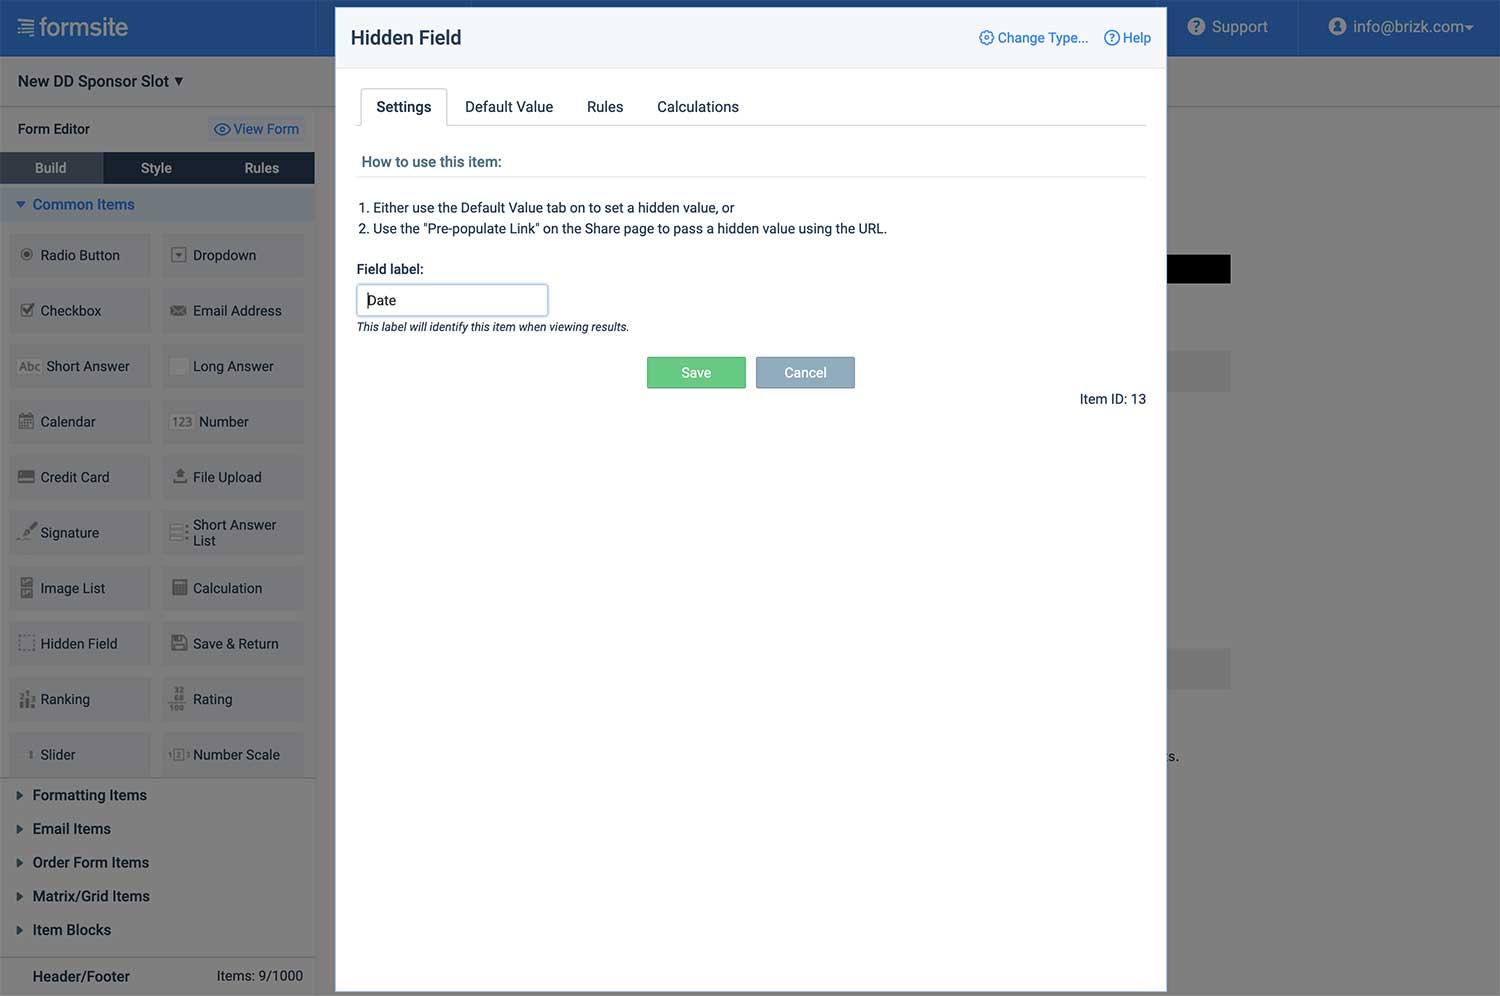
Formsite gives every field a unique ID so that we can interact with it. It calls them pipes. The ID of each field is shown when double-clicking on the field to edit it. Notice the ‘Item ID’ on the bottom right here:
With this ID number, we can send data to the field and call upon it later. So to send data to our hidden fields, I check what their ID number is first, then change the URL to match those IDs. Here’s what this might look like:
Before:
myform.com?date=11-02-2022&price=100&id=123
After:
myform.com?id10=11-02-2022&id11=100&id12=123
To check whether the form is receiving the data correctly, we can use Formsite’s piping method to simply output what is coming in through the URL. To do this, we can create a new description text element in the form and include the pipes for the fields we just created, like so: “This is the price: [pipe11].”
To test whether it’s working, we just grab the official share link of the form and change the URL above to match the actual form URL. It now looks something like this:
https://fs2.formsite.com/Fx2f48K/42yewsfcvu/index.html?id10=11-02-2022&id11=100&id12=123
If everything is working correctly, the pipes in the form should display the same data that we’re entering in the URL. If pipe:11 is the pipe for our price field, the description text should now read: “This is the price: 100.”
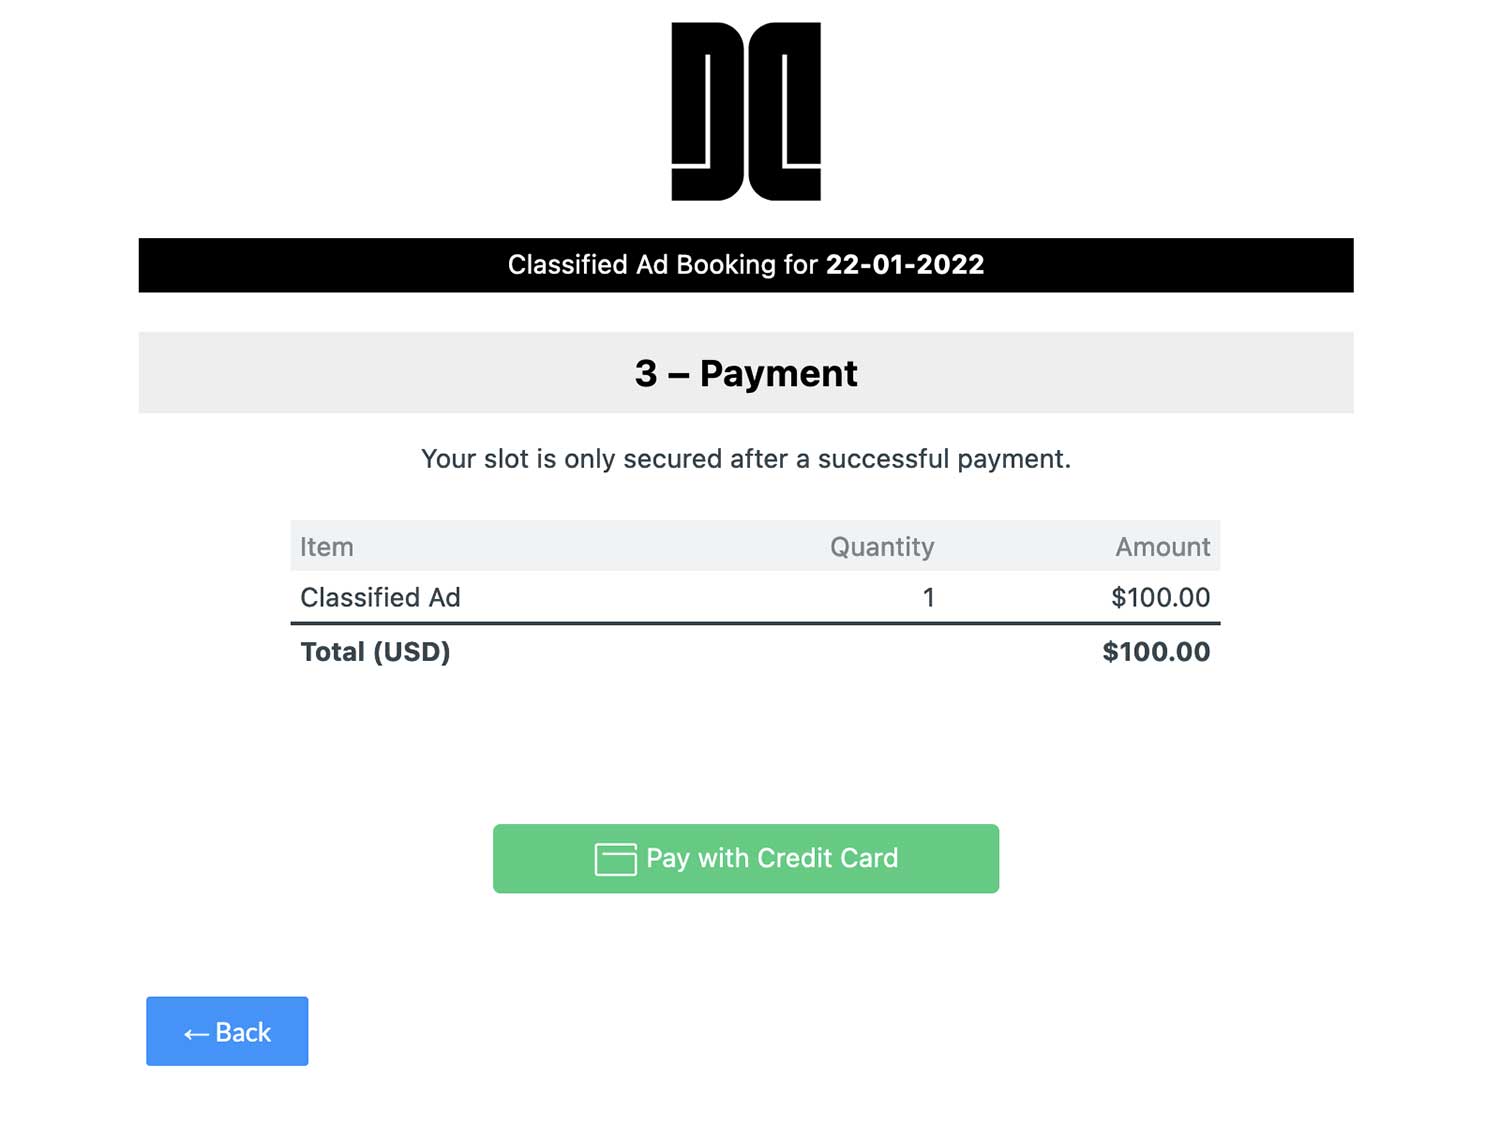
When testing the form and clicking on ‘next’, the form will show an obligatory price summary. Payment happens in the next step. It might look something like this, depending on how much you customise the default look and text:
Using Stripe’s testing API keys, we can now make as many test charges as we like to make sure the form works as intended. Next, we move on to the form settings page.
2 – Setting up form notifications
Formsite offers powerful notification options that allow us to send quite detailed and highly customised email receipts. Using ‘pipes’, we create three different types of notifications:
- Customer receipt: A detailed tax receipt and any instructions we want to send to the customer after the booking.
- Email to self: I always send an email to myself to be notified about new bookings. It’s essentially a copy of the above.
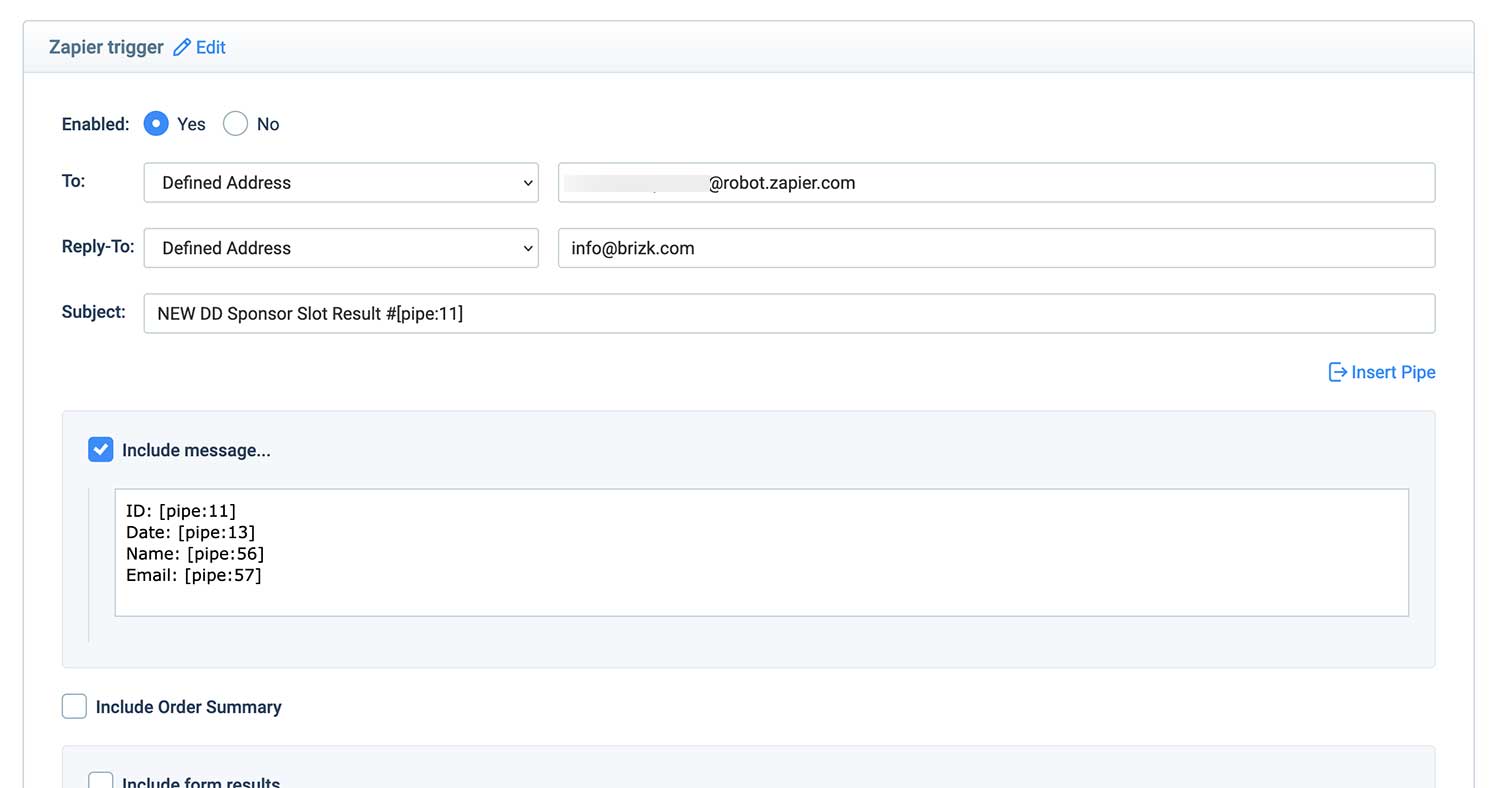
- Zapier trigger: a very minimal email that contains only the most basic info required to automate the next few steps.
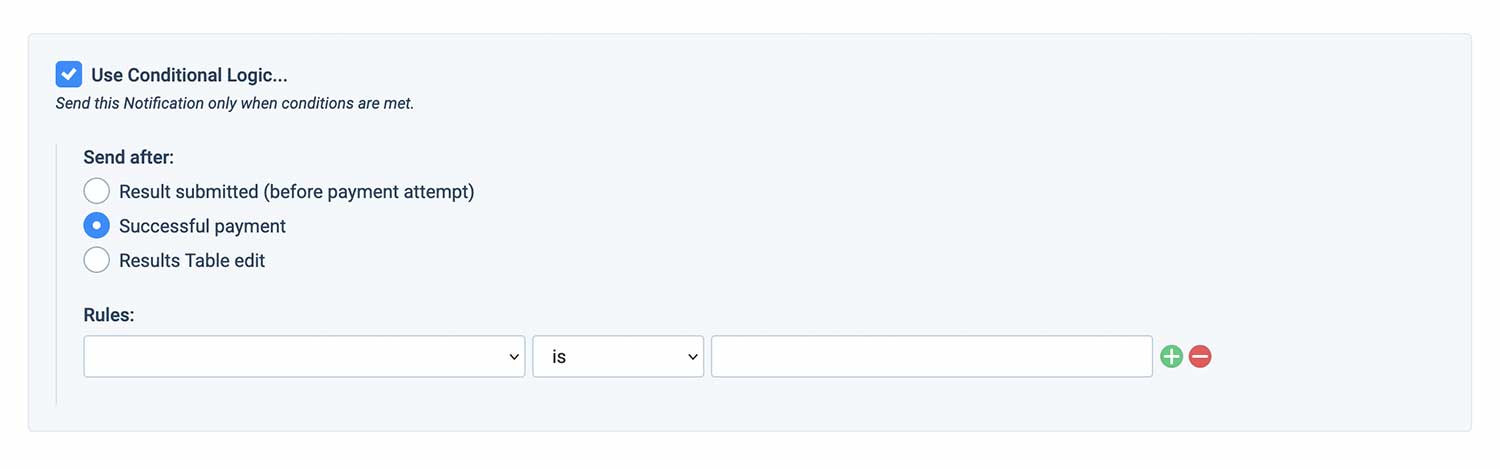
To ensure these emails only go out when the payment was successful, we should enable the following condition at the bottom of each notification:
The email that triggers Zapier actions should be as clean as possible so that Zapier’s bot can easily read the information we’re sending. Here’s an example. (Remember, the ID is the row number in the spreadsheet.)
Notice that we can’t finalise this email yet, since we don’t have a recipient email address. Before setting that one up in Zapier, let’s create the two spreadsheets first.
3 – Creating spreadsheets for selling & managing ad slots
This system works with two separate spreadsheets: One of them is shared publicly and lists the available ad slots – I call this one Ad Calendar. The other one is only accessible to me and that’s where I collect all the data from the incoming bookings – I call that one Ad Schedule.
Ad Calendar
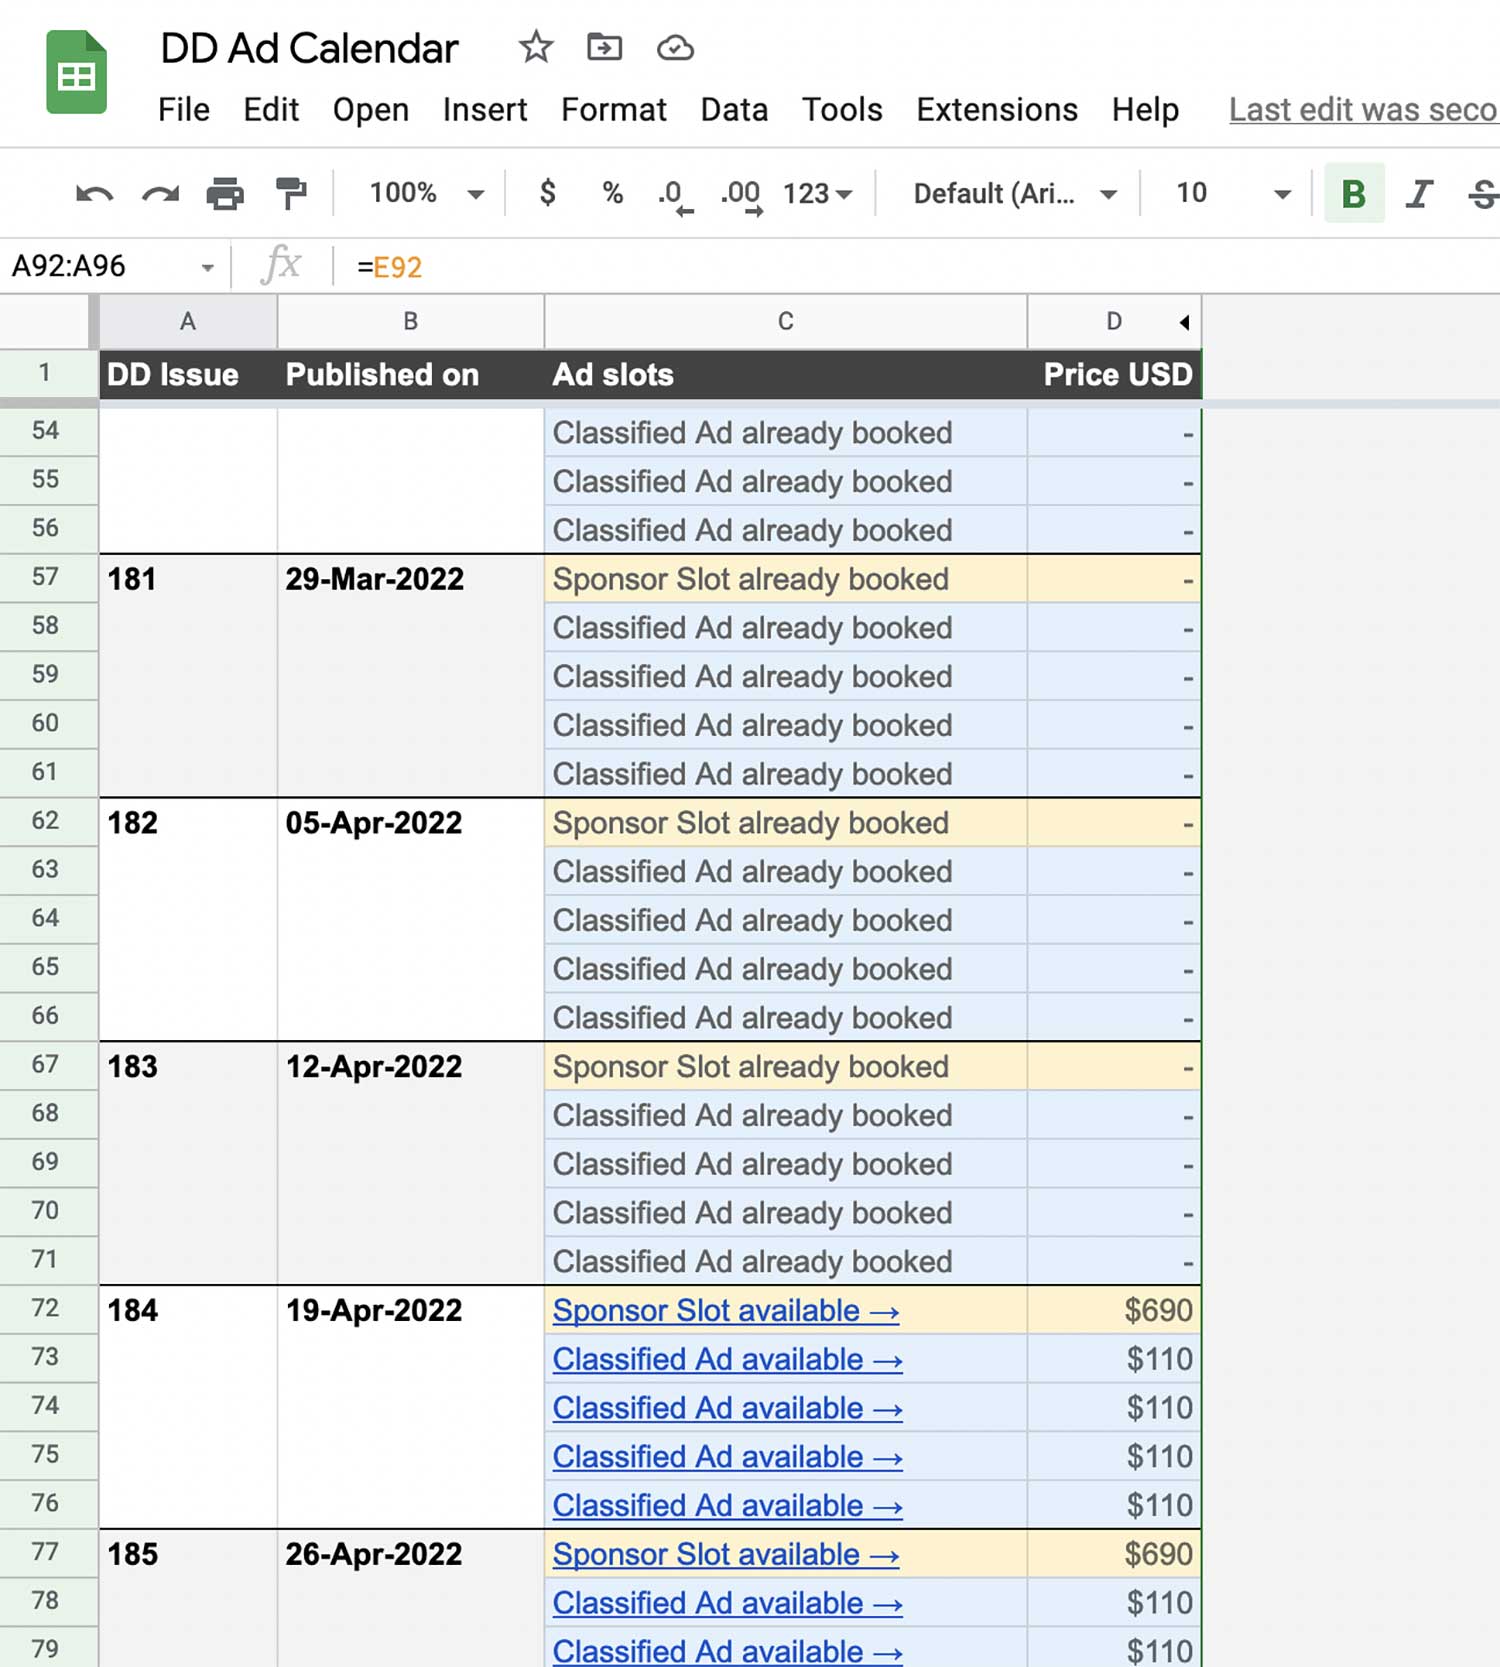
This is where we list all of the available ad slots and attach a date to each of them. As you can see in the image below, I have grouped them so that each block shows the available ad slots per newsletter issue, but the layout is totally up to you. What’s important is that each available ad slot sits on its own row, because the row number will be the unique ID associated with each ad slot.
As described during the form setup above, the most essential info we want to send to the form includes: date, link and price. The column with the link ‘feeds’ off the other cells on the same row. You may have to do some research on how to use functions within a cell to create replicable links like this, but it’s not overly complicated. This is an example of what a ‘link’ cell may look like:
=HYPERLINK("https://fs2.formsite.com/C5Fxn43K/z8afvcuwc6ml/index.html"&"?id11="&ROW()&"&id24="&D74&"&id13="&TEXT(F74,"dd-mmm-yyyy"),"Classified Ad available →")
This fills the cell with the link to the form and uses the row number and the price we enter on the same row. We can then simply drag that cell down to replicate the link with different dates, creating the ad calendar for the whole year. I usually release available ad bookings two to three months in advance, which means I simply hide dates that are further in the future than three months and release them as the year progresses.
Change the share settings of the sheet so that anyone can ‘view’ the document and we now have our public Ad Calendar.
Ad Schedule
To manage bookings easily, I collect all the incoming bookings in a separate, private Google spreadsheet that I usually keep pinned in my browser. To set up this spreadsheet we create four columns: Date, ID, Name, Email. We don’t need to do anything else here for now.
Time to set up Zapier.
4 – Connecting spreadsheets and forms through Zapier
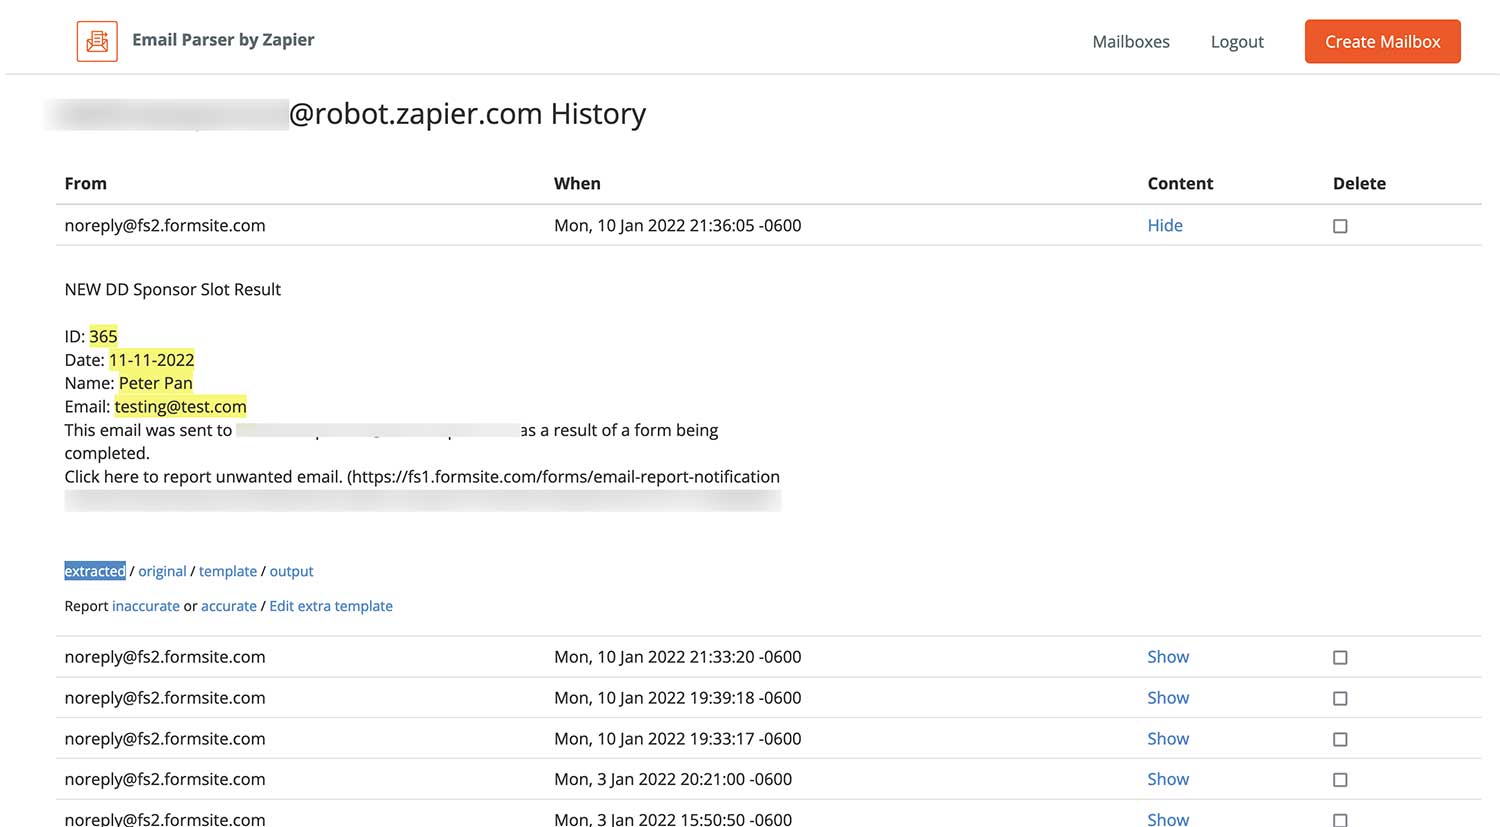
First, we’ll focus on getting our booking information into Zapier. Remember the Formsite notification email we set up above? We want to send this email to Zapier and to do so we use Zapier’s Parser product. Parser is essentially an email inbox that reads any email it receives and in order to extract data from it. You can set up your first inbox and call it something unique and hard-to-guess, such as:
The setup of these mailboxes can be a bit confusing at first, but with a bit of help from the Zapier documentation, it’s easy to figure out. Once you’ve set up the email address for receiving info, copy and paste the address as a recipient into the Formsite notification we created above. From now on, every time a booking has been completed, the basic info about this booking will be sent to our new Zapier mailbox.
To continue with the setup, use the booking form to create a sample booking. If completed successfully using Stripe’s testing card details, there should be an email in our newly created Zapier inbox. Use the ‘template editor’ to show Zapier which parts of the email you’d like to use. The info we’d like to extract are, of course, the ID (row number), the date, the name and the email address:
Once the extraction template is set up, we can start using this information in Zapier. The Zap we’re creating does the following:
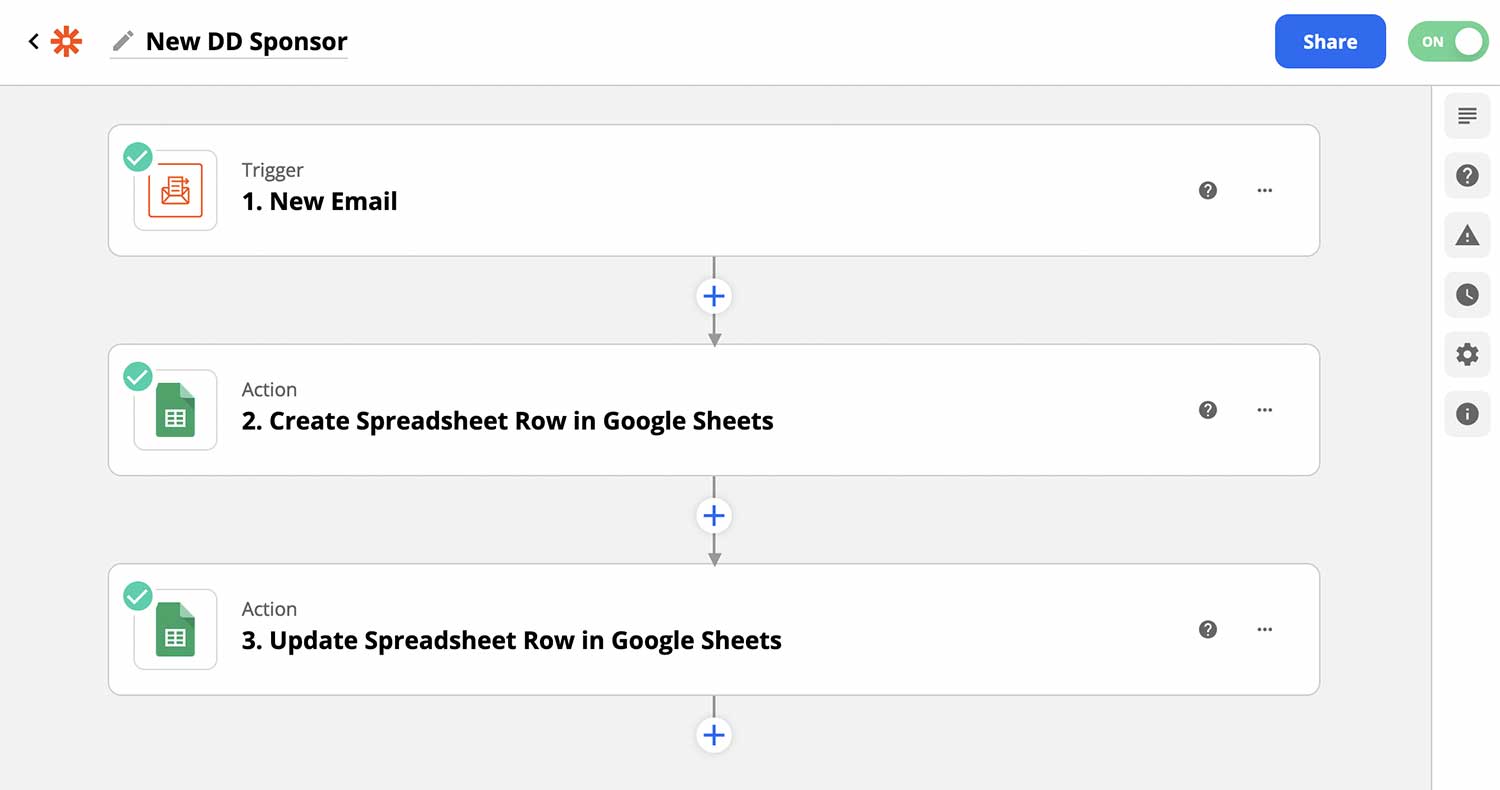
As a trigger we use the incoming email to the mailbox we just set up.
Next, we want to add that info to our Ad Schedule sheet, so we use the ‘Create Spreadsheet Row in Google Sheets’ action to do this. In this step, we simply match the info from our email to the columns we created earlier.
Finally, we want to mark the slot that was just purchased as ‘sold’ in our Ad Calendar sheet, so that we stop others from booking the same slot. We use the ‘Update Spreadsheet Row in Google Sheets’ action for this. Remember that our ID is the row number, so with this action we ‘find’ the row of the ad slot that was booked first, and then change the cell ’link’ of that row into a simple plain text that reads something like ‘Slot already booked’. This automatically overwrites/removes the link and others won’t be able to book the same ad again.
Once activated, this Zap will now add new bookings to our Ad Schedule and automatically remove the link for the ad that was just booked in our Ad Calendar.
5 – Splitting more complex forms
As mentioned earlier, the booking form for my classified ads not only collects name, email addres and billing info, but the text and link of the actual classified ad, too. Filling out this information can take a while, so in order to guide customers as quickly as possible through the booking process and mark the slot as ‘unavailable’ for others, I decided to break the process into two separate forms. I’m largely using the same technique as above with a few adjustments.
After customers have completed their booking, we don’t send them to a ‘thank you’ page, but instead forward them to a new, a second form where we collect the classified text and link. (You can nominate a forwarding URL in the form settings under ‘Success Pages’.) It’s pretty much invisible to the customer – all they see is a multi-step form that collects a payment half-way through.
We can pass the details of the first form to the second form, again, through parameters in the URL, which looks a little chaotic at first, but it’s basically just filling a lot of hidden fields with the info we collected earlier.
https://fs2.formsite.com/Fxn45u1K/zgpyaarfjv/index.html?id11=[pipe:11]&id13=[pipe:13]&id60=[pipe:56]&id61=[pipe:57]&id68=[pipe:24]&id63=[pipe:59]
The Zapier setup is also slightly different to accommodate the two-step process. As above, the first form sends an email to Zapier kicking of a Zap that marks the slot as ‘unavailable’ on the Ad Calendar. The second form does most of the heavy lifting, sending the email notifications to the customer and myself and also another (basic) email to Zapier to add the details of the booking to our Ad Schedule. You will have to set up unique Zapier mailboxes for each of those steps.
–
There you have it: a simple, custom ad booking system that connects a bunch of existing tools. I hope this explainer wasn’t too confusing. Since all three tools – Formsite, Google and Zapier – are interlinked, it can be tricky to find a starting point (and explain it coherently), but as long as you’re using Stripe’s testing API keys (and don’t forget to swap them for the live ones at the end) you can’t break anything, so test and experiment away freely!
If you have any questions or feedback on how to improve this post, reach out.
Last updated: January 2022